Get a copy of the repository on your system
The first thing you’ll need to do is clone the project’s repo. Run this command in a terminal:
git clone <repo-URL>Here’s where you can find a project’s repo’s URL…
…if the project is hosted on Jason’s Web Site.
Go to my Git repo list. 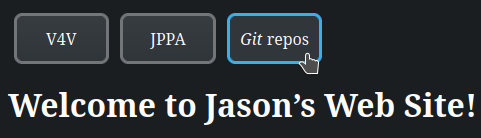
Select a project. 
Choose one of the repo’s URLs. I recommend using the https://one.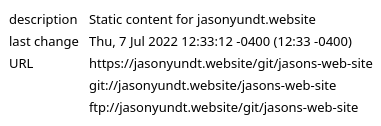
…if the project is hosted on
pagure.io.Navigate to the project’s page. 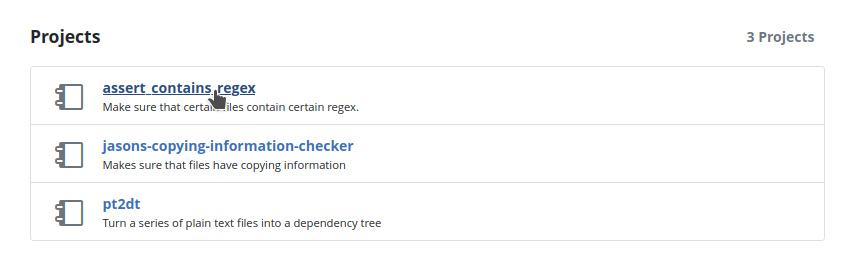
Click on the clone button to reveal the repo’s URL. 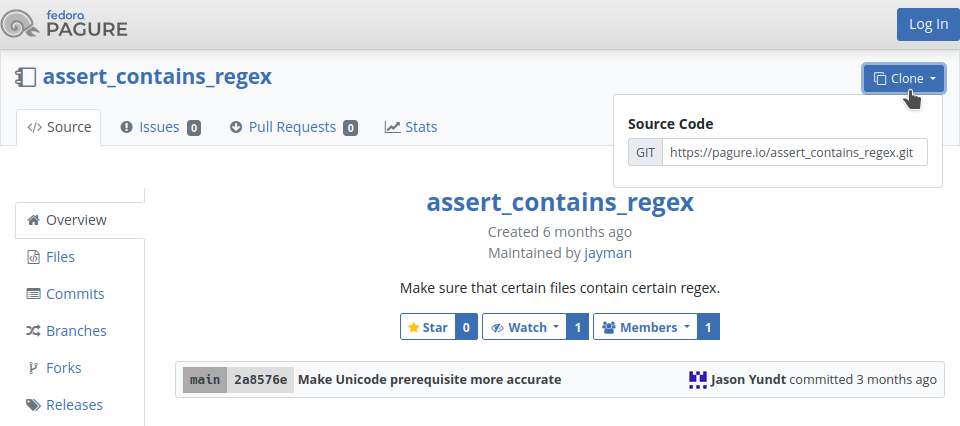
…if the project is hosted on
gitlab.com.See GitLab’s official documentation.
…if the project is hosted on
github.com.See GitHub’s official documentation.

Try out the project on your system
Eventually, you’re (probably) going to want to test out your changes. Before you do, it’s a good idea to test out an unchanged version of the project. Every project is different, so open up the repo you just cloned and start looking through the README. You should be able to figure out how to run or use the project by reading the README or by reading files that the README references. If you can’t, then please email me questions because the project’s documentation should probably be improved.
Create a branch that contains your proposed changes
In Git, a branch is like a timeline. Each branch contains a sequence of snapshots. Each of those snapshots is a single event in the branch’s history.
Open a terminal in your clone’s directory, and run this command:
git branchGit will then tell you what branch you’re currently on. It will also list any other branches that you add to your clone. Your current branch will probably be named “main” (I think that the default branch for most of my repos is named “main”). To stay organized, it’s a good idea to create a new branch for each of your patches. To do so:
- Determine what branch you’re currently on:
git branch - If you’re not on the default branch, the switch to it:
git checkout mainIf the repo doesn’t have a branch named “main”, then adjust that command accordingly.
- Create a copy of your current branch:
git branch <branch-name> - Switch to your new branch:
git checkout <branch-name>
At this point, you’ve created your own branch but haven’t added anything to it yet. At the moment, your branch is identical to the main branch. Now it’s time to get to work. Create new files, delete old files or edit existing files. Don’t worry too much about making an unwanted change because Git is already holding onto multiple snapshots of the files in the repo. Every so often, you should create one of these snapshots. To do so:
- Determine what files have been created, deleted or edited:
git status - Before you can take a snapshot, you have to “stage” your changes. Changes that aren’t staged won’t make it into the snapshot.
- If you created or edited a file, then run:
git add <path-to-file> - If you deleted a file, then run:
git rm <path-to-file> - If you renamed or moved a file, then run:
git mv <old-path> <new-path>
git statusagain to see what changes are staged and unstaged. - If you created or edited a file, then run:
- Take the snapshot:
This will create a new commit and put it at the tip of your current branch. In Git, snapshots are called “commits”.git commit
Send your patch to me
Once you’ve created one or more commits, it’s time to turn those commits into a patch and send them to me.
What to do if the repo is hosted on Jason’s Web Site.
You have four different options. For your first patch I recommend choosing the first one.
Easiest:
git-bundle- Remember the name of the branch you created before. If you don’t remember it off of the top of your head, then you can run
to get a list of branches.git branch - Create a bundle that contains your changes:
That command is a little bit tricky. It creates a bundle file named “git bundle create <your-branch>.bundle main..<your-branch><your-branch>.bundle”. The last part of the command tells Git what to put into your bundle. “main..<your-branch>” means “every commit that’s in<your-branch>, but isn’t in main yet”. - Email me the bundle. (If that links doesn’t work on your system, send it to “jason@jasonyundt.email”).
- Remember the name of the branch you created before. If you don’t remember it off of the top of your head, then you can run
Easy:
git-format-patch+ compression- Remember the name of the branch you created before. If you don’t remember it off of the top of your head, then you can run
to get a list of branches.git branch - In your clone’s root directory, create a folder named “patch-v1”.
- Generate patch files:
git format-patch \
	-o patch-v1 \
	--to='jason@jasonyundt.email' \
	--subject-prefix='PATCH <repo-name>' \
	main..<your-branch>
If you’re interested in what that command does, then click here.
\At the end of every line (except for the last one) is a backslash. Those backslashes allow me to break up the command over multiple lines. The last line doesn’t have a backslash, so Bash interprets the final newline as the end of the command. git format-patchThis tells Git to create a series of patch files. Git will convert each commit that is specified into a patch file. A commit is a snapshot, it contains everything that was in the repo at the time it was taken. A patch file is a diff, it only contains information about what was changed. I’ll be able to (approximately) recreate your commits using the patch files that you generate. -o patch-v1This part is optional. It tells Git to put the patch files into a folder named “patch-v1”. I like to do this to stay organized. --to='jason@jasonyundt.email'This part is optional. It’s only really useful when sending patches using git-send-email. All it does is add a “To” field to each of the patch files. I include it because I think that it’s a good habit.--subject-prefix='PATCH <repo-name>'This part is optional. It’s only really useful when sending patches using git-send-email. This changes what goes in front of the patch files’s “subject line”. It’s useful for making sure that the recipient knows what repo the patch files are for.main..<your-branch>This part specifies which commits should be turned into patch files. “ main..<your-branch>” means “every commit that’s in<your-branch>, but isn’t in main yet”.
- Compress the patch-v1 folder. You can do so by running this command:
or you can use another method that you’re more familiar with.tar -cf patch-v1-compressed.tar.zst --zstd patch-v1 - Email me the compressed archive. (If that links doesn’t work on your system, send it to “jason@jasonyundt.email”).
- Remember the name of the branch you created before. If you don’t remember it off of the top of your head, then you can run
Medium:
git-request-pullThis strategy is good for people who already have some experience with Git. It’s not recommended for new users.
- If you don’t already have one that you want to use, create a public remote repository. If you’re not sure how or where to do this, then follow this guide to create a new repo on Codeberg.
- If you haven’t already, tell your local clone about your remote repo:
Make sure thatgit remote add pr <remote-repo-URL><remote-repo-URL>is a publicly accessible URL (use HTTPS, not SSH). - Remember the name of the branch you created before. If you don’t remember it off of the top of your head, then you can run
to get a list of branches.git branch - Make sure that an up-to-date copy of your branch is available on the remote:
git push pr <your-branch> - (Optional) Resize your terminal to 78 characters wide.
- Generate the pull request message:
git request-pull main pr <your-branch> - Copy the pull request message and email it to me. (If that links doesn’t work on your system, send it to “jason@jasonyundt.email”).
Hard:
git-format-patch+git-send-emailPatches should be sent to “jason@jasonyundt.email”. If you don’t already know how to use
git-send-email, then check outgit-send-email.io. I’ll give you some advice thatgit-send-email.iodoesn’t mention: you can generate patch files usinggit-format-patch(don’t compress them), and then send them usinggit-send-email:git send-email <directory-that-contains-patch-files>Most of the options that you can pass to
git-send-email(like--to,--ccor-v2) can also be passed togit-format-patch.
What to do if the repo is hosted on
pagure.io.- If you don’t already have one, create a fork of the upstream project.
- If you haven’t already, tell your local clone about your fork by adding it as a remote:
“pr” is just a name. You can call your remote whatever you want.git remote add pr <your-fork’s-URL> - Remember the name of the branch you created before. If you don’t remember it off of the top of your head, then you can run
to get a list of branches.git branch - Push your local changes from your local repo to your remote fork:
git push pr <your-branch> - On the upstream repo’s page, create a pull request.
What to do if the repo is hosted on
gitlab.com.- If you don’t already have one, create a fork of the upstream project.
- If you haven’t already, tell your local clone about your fork by adding it as a remote:
“pr” is just a name. You can call your remote whatever you want.git remote add pr <your-fork’s-URL> - Remember the name of the branch you created before. If you don’t remember it off of the top of your head, then you can run
to get a list of branches.git branch - Push your local changes from your local repo to your remote fork:
git push pr <your-branch> - On the upstream repo’s page, create a merge request.
What to do if the repo is hosted on
github.com.- If you don’t already have one, create a fork of the upstream project.
- If you haven’t already, tell your local clone about your fork by adding it as a remote:
“pr” is just a name. You can call your remote whatever you want.git remote add pr <your-fork’s-URL> - Remember the name of the branch you created before. If you don’t remember it off of the top of your head, then you can run
to get a list of branches.git branch - Push your local changes from your local repo to your remote fork:
git push pr <your-branch> - On the upstream repo’s page, create a pull request.